Food Pantry Management Software
This is a tour of how Kiva Logic can be used to help manage your food pantry. The Kiva Logic software contains a special set of features specifically designed for Food Pantry operation. While most of all the other features in Kiva Logic are still available for use, some are hidden away on the admin side, like the "Payments" pages and the "Discount Codes" page.
You can visit our demonstration site at foodpantry.kivalogic.com. For access to the admin side of the Food Pantry demo, or if you would like to use an existing verified client account, please send an email to hello@kivalogic.com or send us a message on our contact form.
Account Portal
Kiva Logic can run on a sub-domain of yours, so you can keep your existing website. We'll match your website colors and design to create a high level of continuity between your main website and the sub-domain that Kiva Logic runs on.
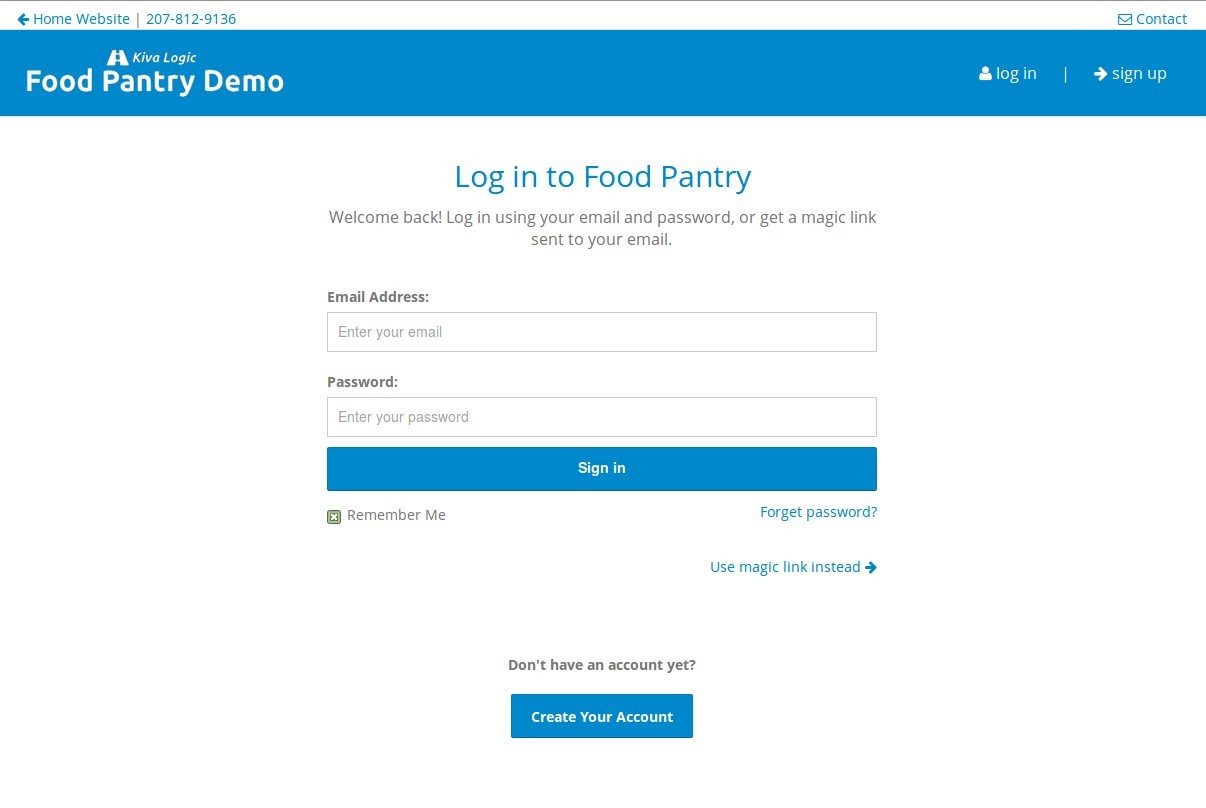
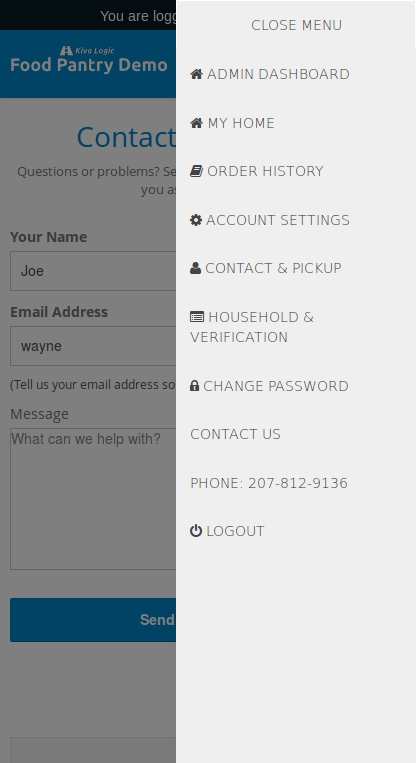
When clients first land on the entry portal to the Kiva Logic software, they will see the option to log in or sign up. If they are already logged in and have 'remember me' enabled, they will automatically be redirected to their account overview page.
They can also use our magic link feature to have an email sent to them that will provide a one-click automatic login so they don't even have to enter or remember a password if they don't want to.
Client Onboarding
The client onboarding process is broken into three steps:
All three steps must be completed before the client can receive services and/or distributions.
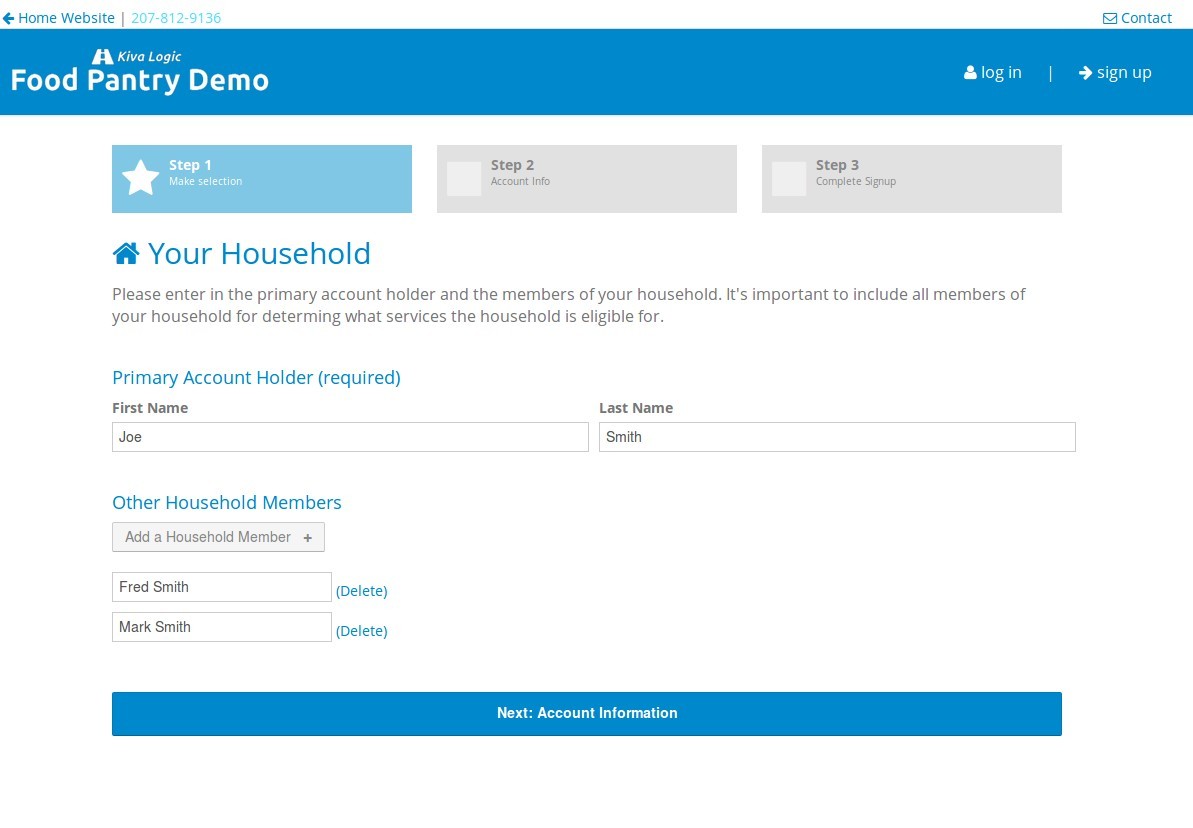
1. The Sign-Up Process
The first step of the sign-up process prompts visitors to enter their name and the names of everyone in their household. The number of people in the household is used to determine what box size the client should receive.
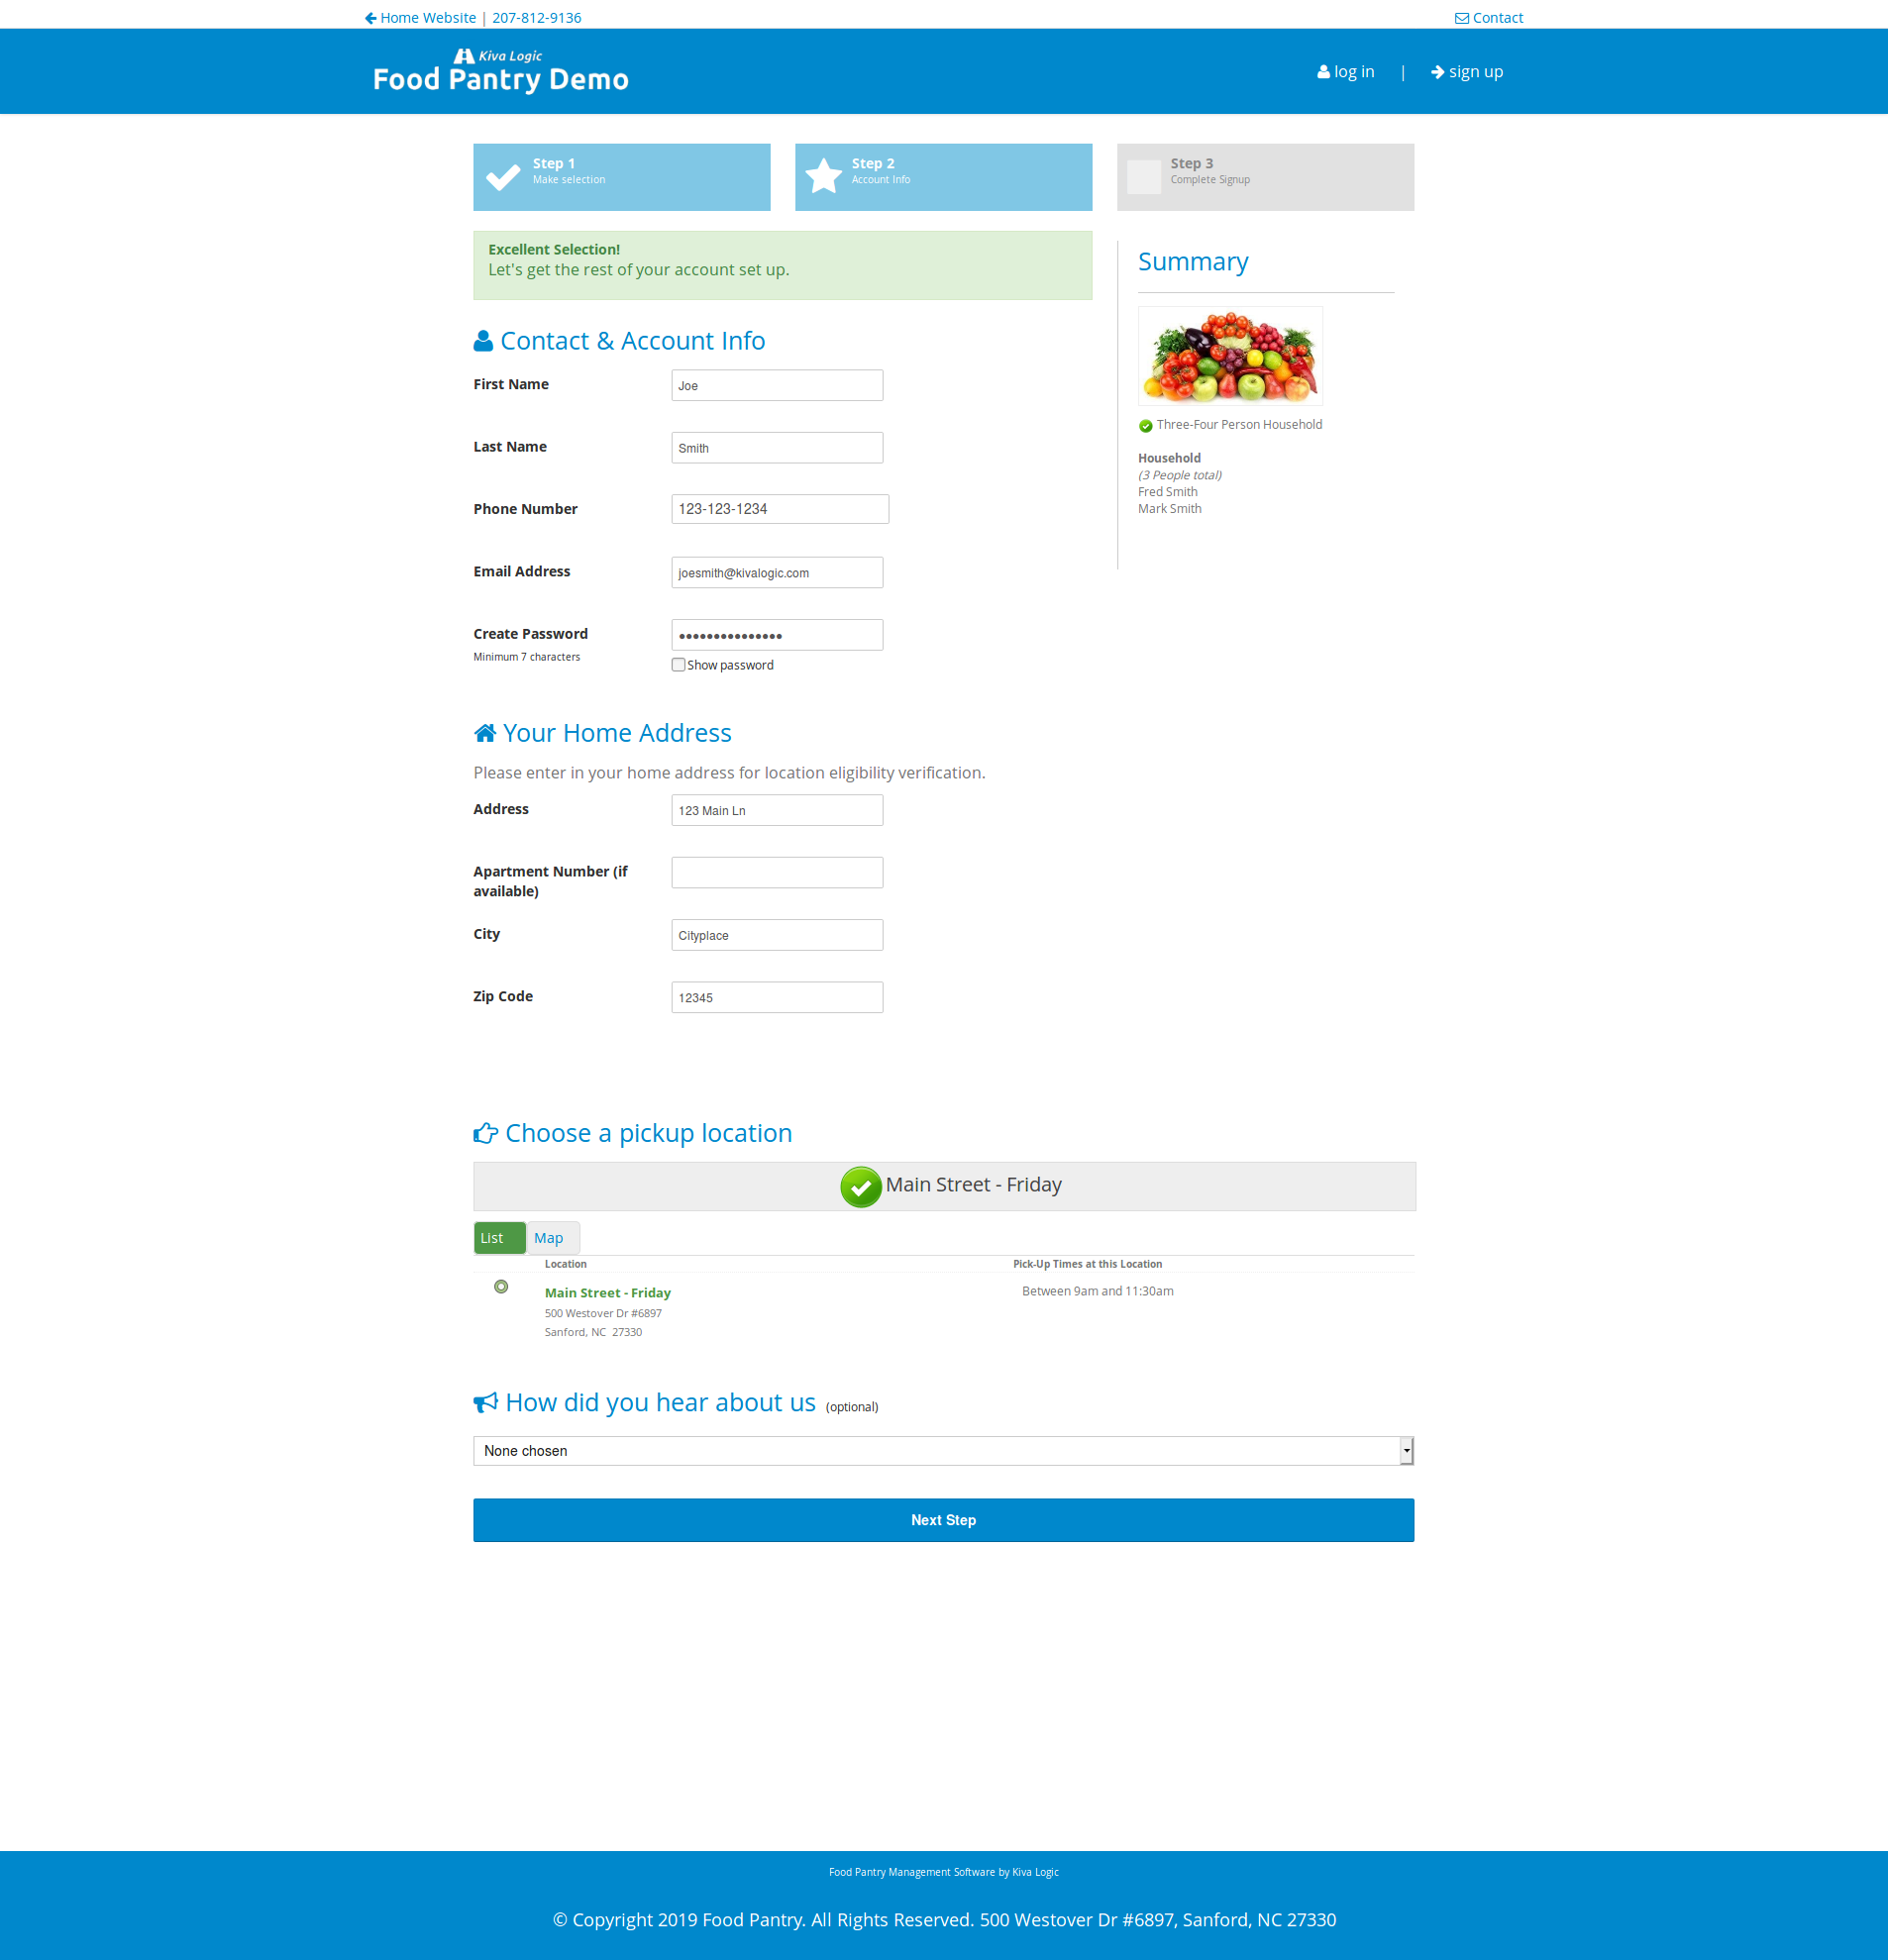
The second step asks for contact information, home address information, and prompts clients to select a pick-up location.
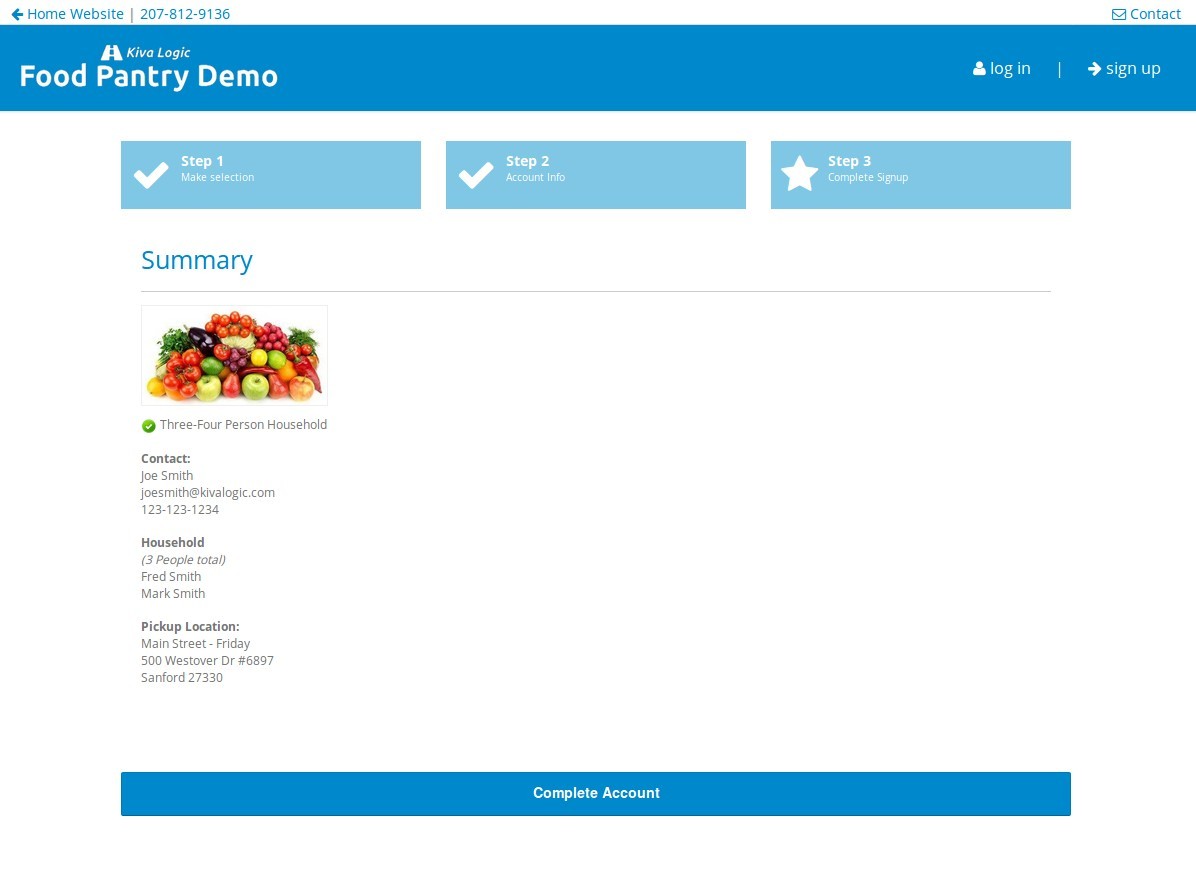
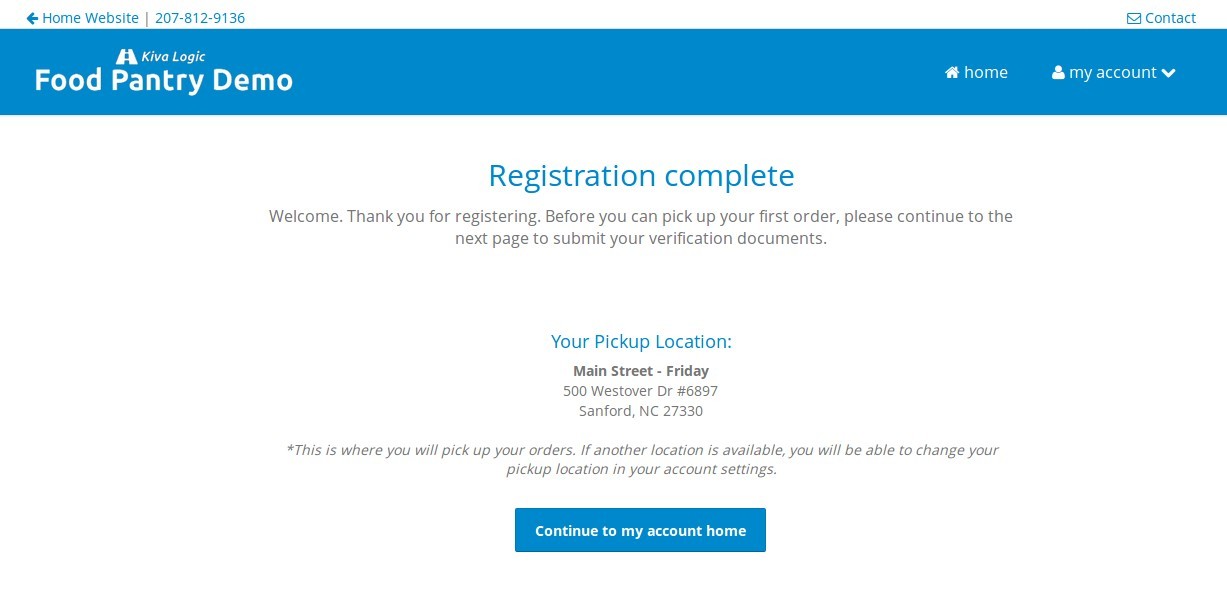
The final step before a new account is created shows the details entered, and if the clients need to change anything they can click on the buttons above to go to previous steps.
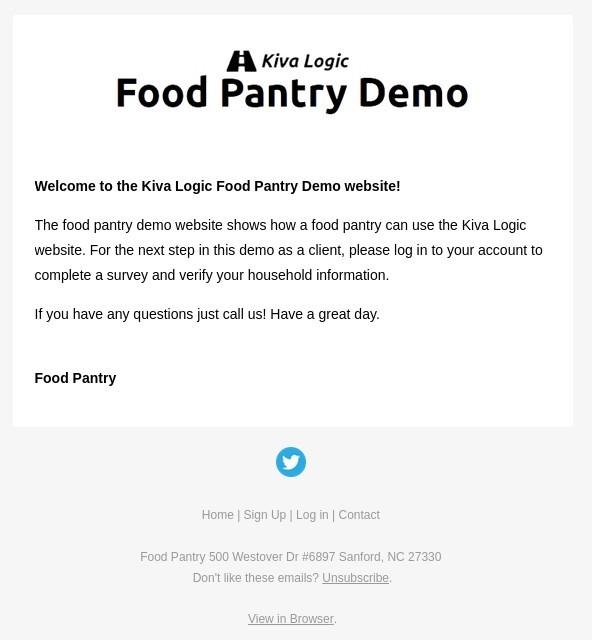
When the sign-up process has been completed, clients will see a 'Registration Complete' page. At this time, the "Welcome Email" is also generated and sent to clients.
The "Welcome Email" can be edited on the admin side to say whatever you would like, here is an example:
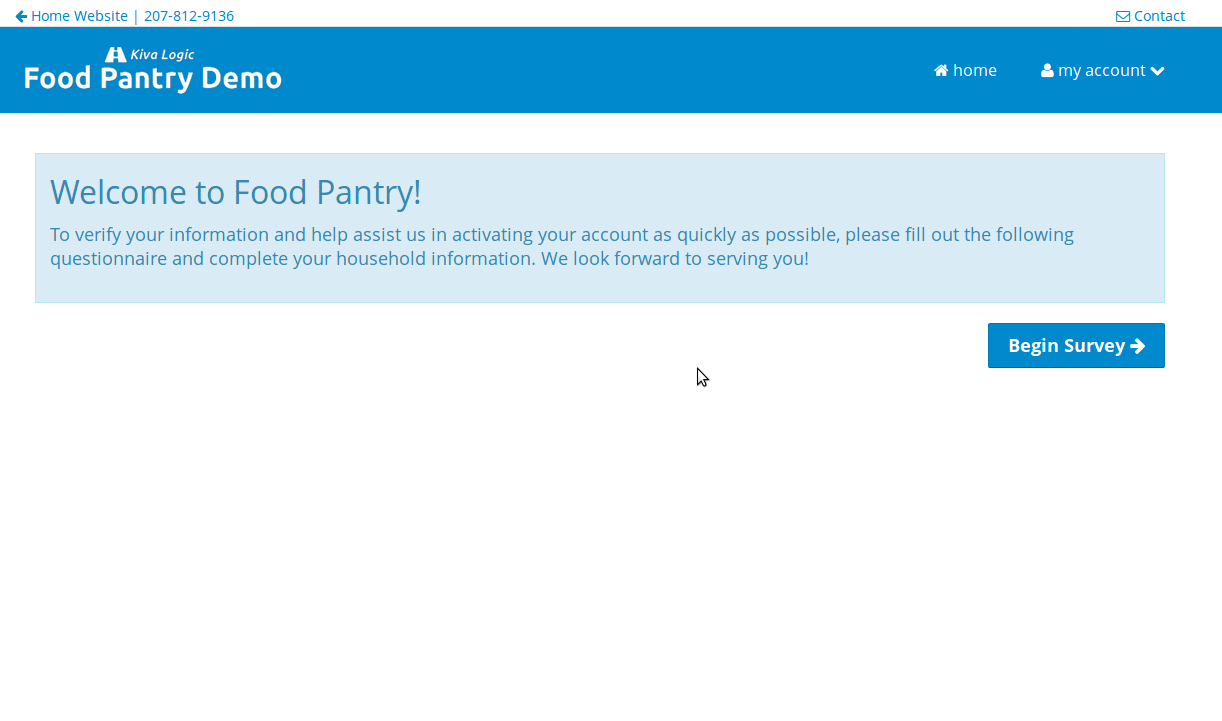
2. The Survey
When a new client visits their account overview page for the first time, they are prompted to take a quick survey. The survey allows your organization to collect some demographic data about the clients that use your food pantry in order to help better serve those clients.
All questions are optional, and clients are not required to supply any of the information.
After the survey, new clients are prompted to continue on to the verification stage.
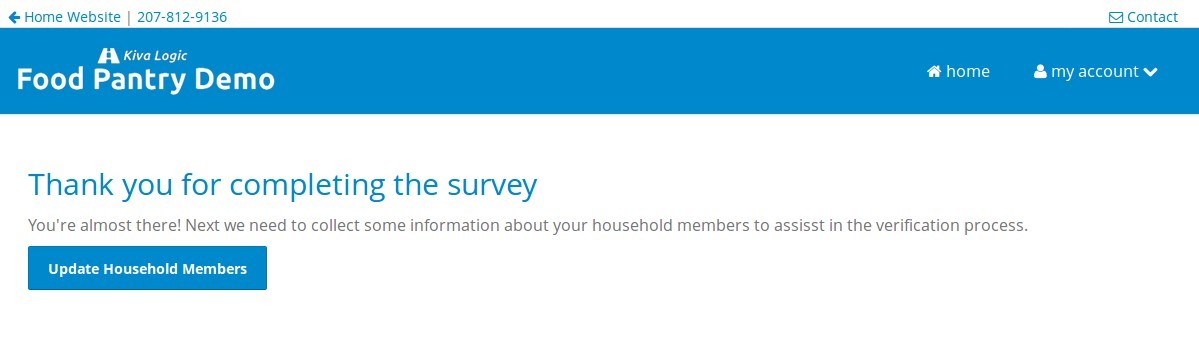
3. The Verification Process
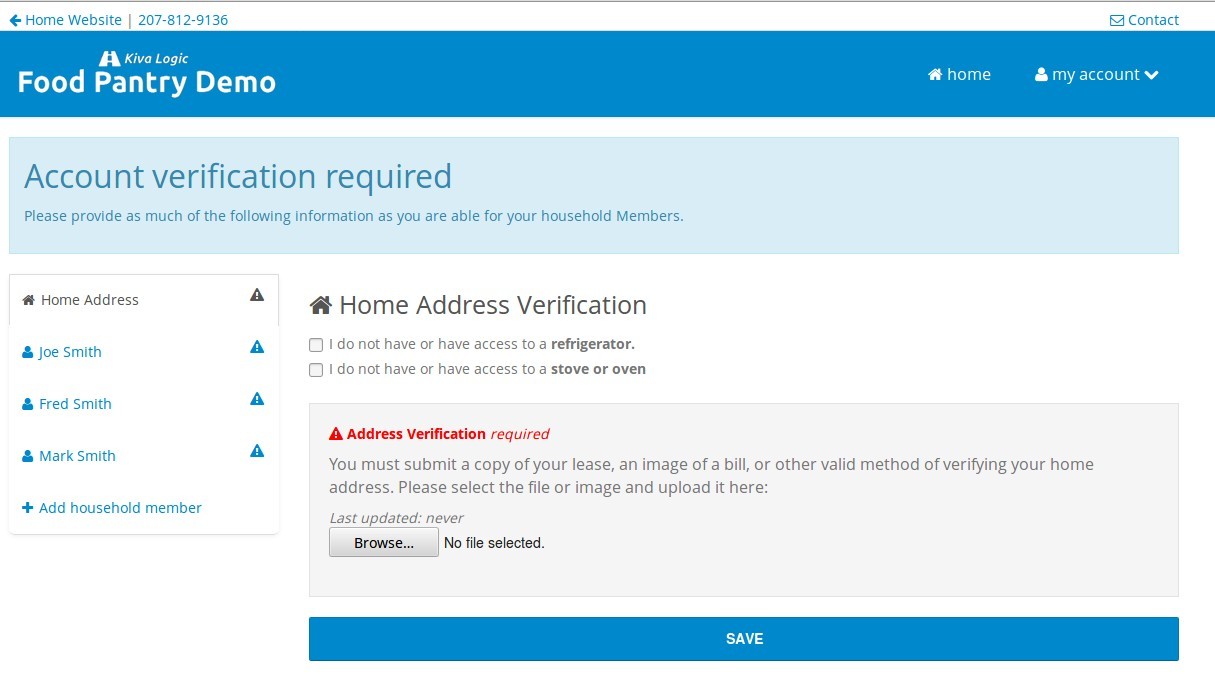
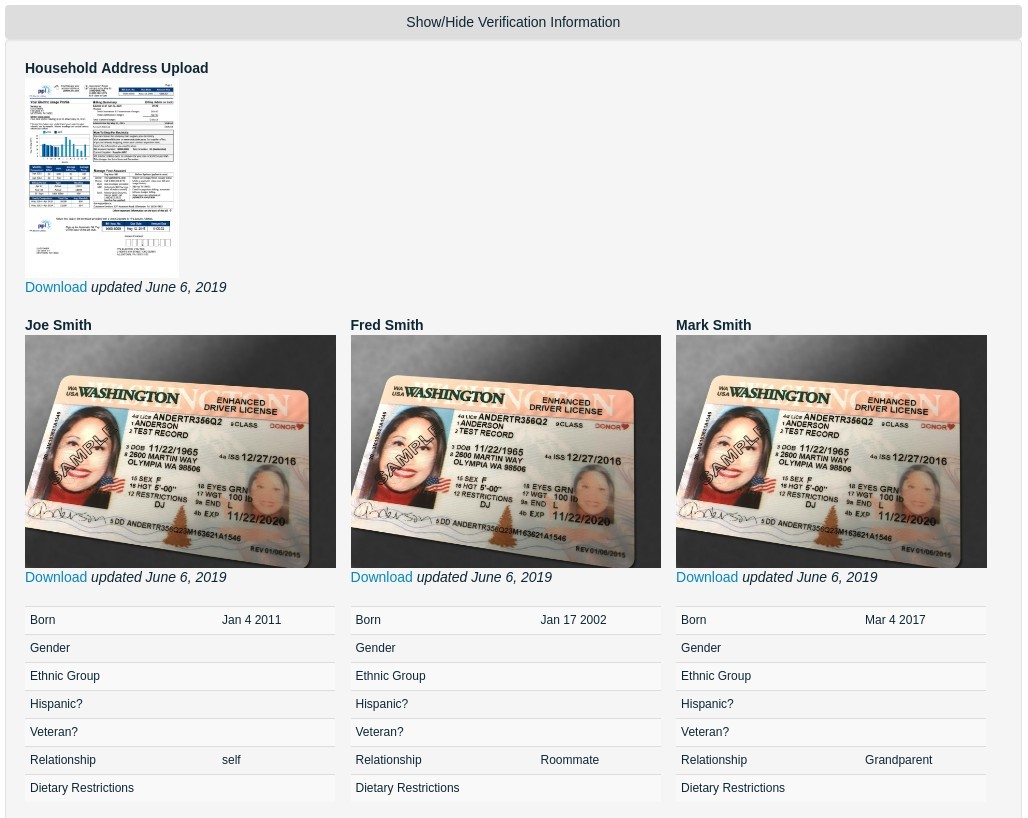
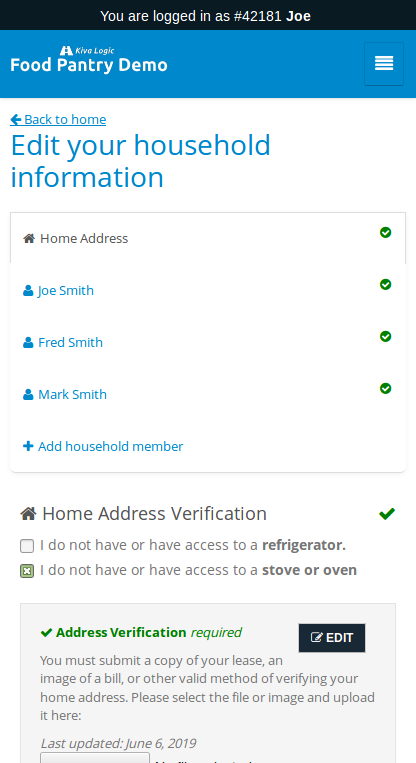
To verify a new client, the client must upload an image or document to verify their address so that you can make sure they are in your service area. They are also prompted to upload a document or image to verify the identity of each household member.
Home address verification screenshot:
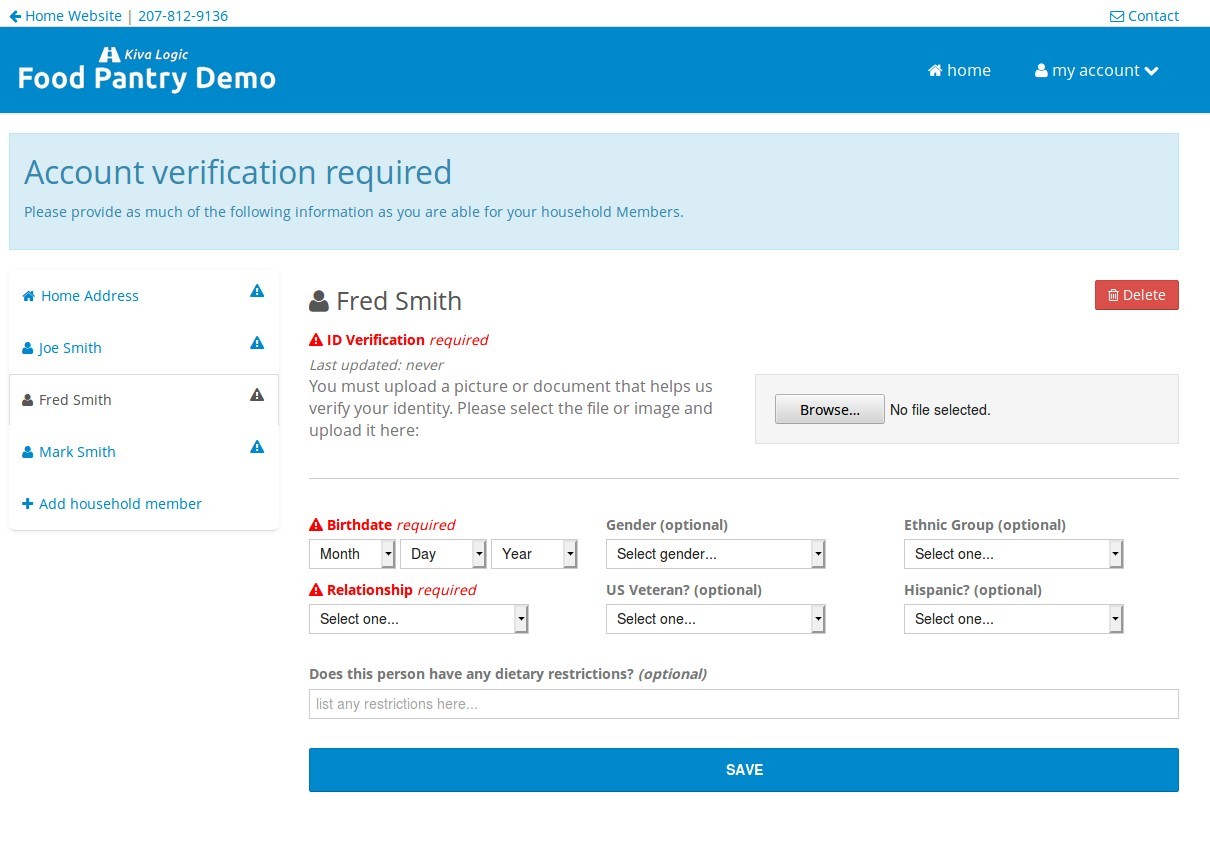
For each household member, they must upload an image or document to verify their identity, provide their birthdate, and select their relationship to the primary member. All other fields are optional. The primary member of the household cannot be deleted, but the other household members can be deleted, and the client can also add new household members as well.
If household member(s) are deleted and the household size decreases, the Kiva Logic software will look at your box settings to see if the box size of the client needs to be updated to a smaller size based on the minimum and maximum household members allowed for each of your boxes.
Household member verification screenshot:
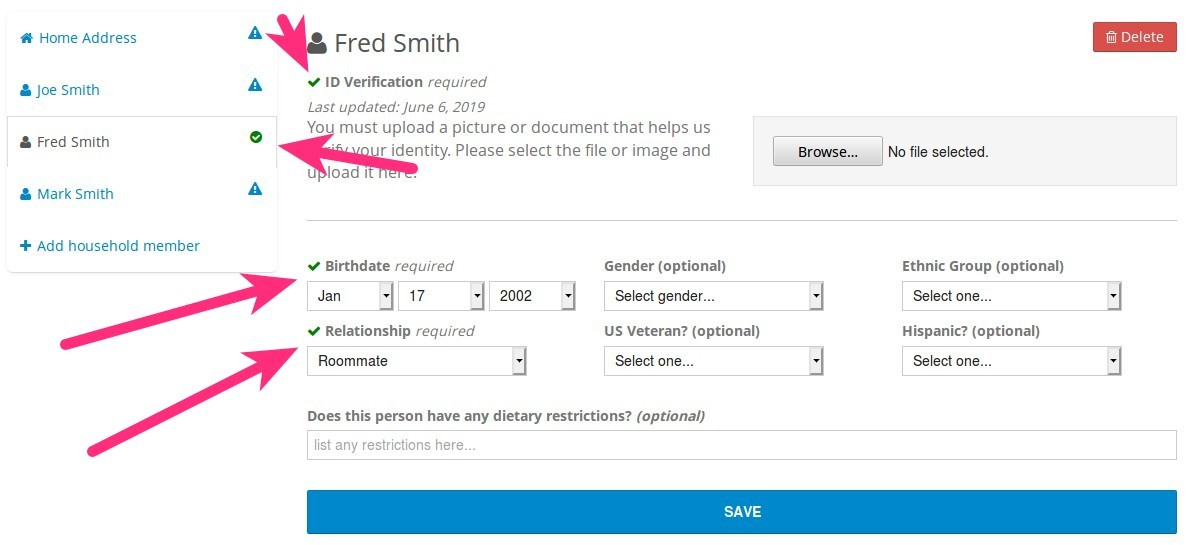
As the information is saved, little green checkmarks will appear next to the required fields.
When all required fields have been completed, the client will see an 'Account Verification Pending' message:

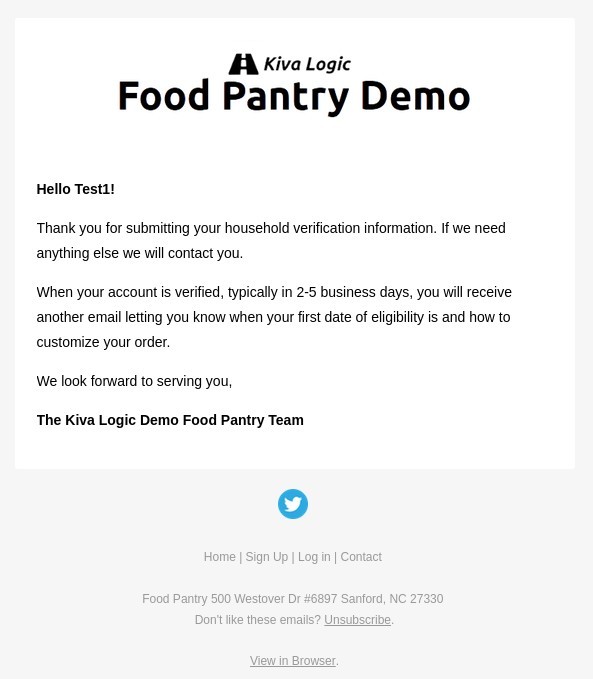
The client will also receive the email template called 'Verification Submitted by Client', which can be edited on the admin side at any time. This is just to let the client know that their information has been received and what will happen next:
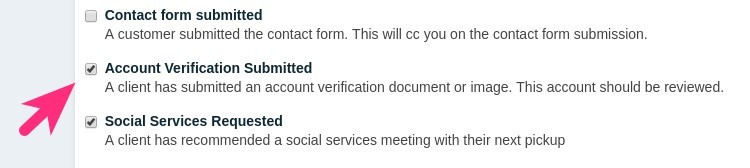
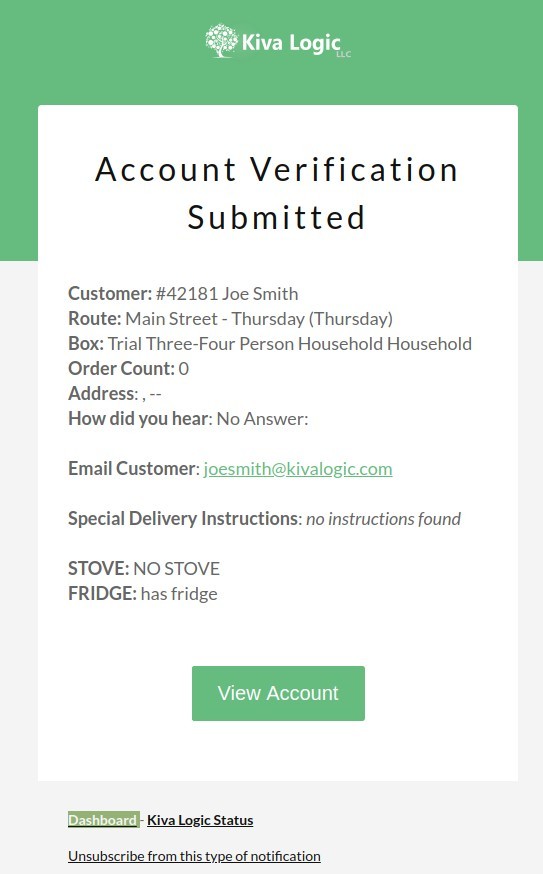
At the same time, any admin user that has the admin email notification called 'Account Verification Submitted' will receive an email. This setting can be updated by an admin user on their admin account overview page. This notification is meant to let your pantry know that a new client requires verification, so when you receive this notification you should log in to the admin dashboard to verify the customer's account. There will also be a note and reminder placed on the dashboard that the client requires verification.
Example of the 'Account Verification Submitted' admin email notification:
At this point, there is nothing further required of the client until an admin user completes the rest of the verification process.
Verifying a New Client
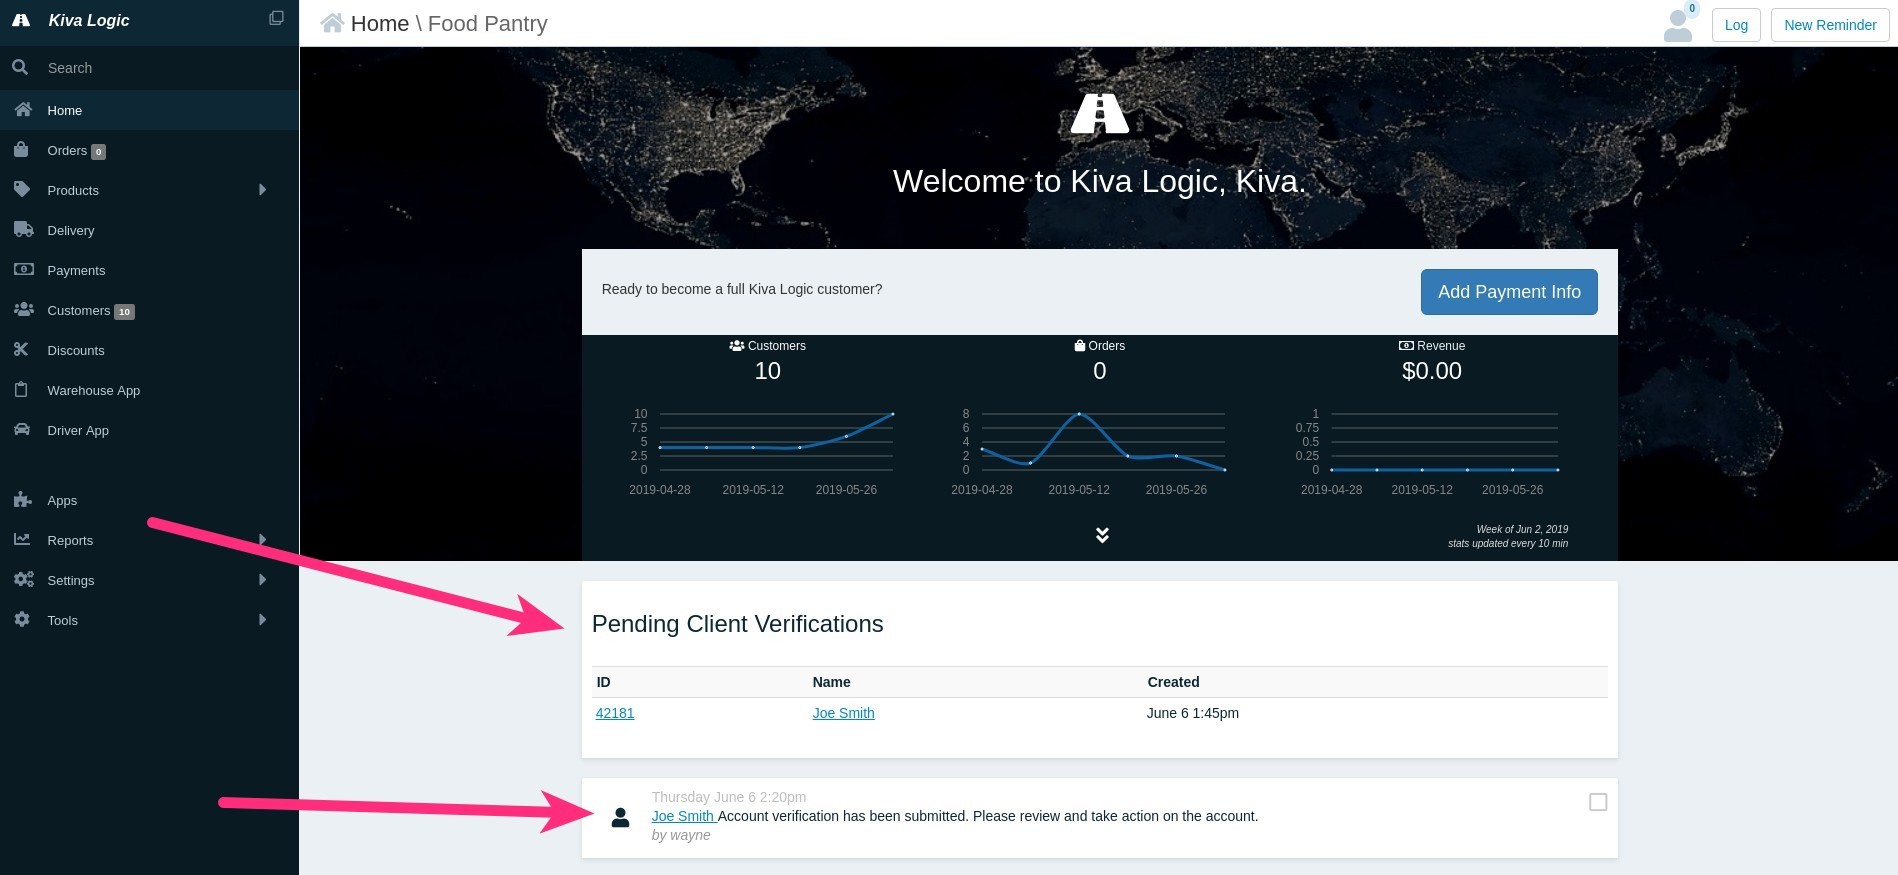
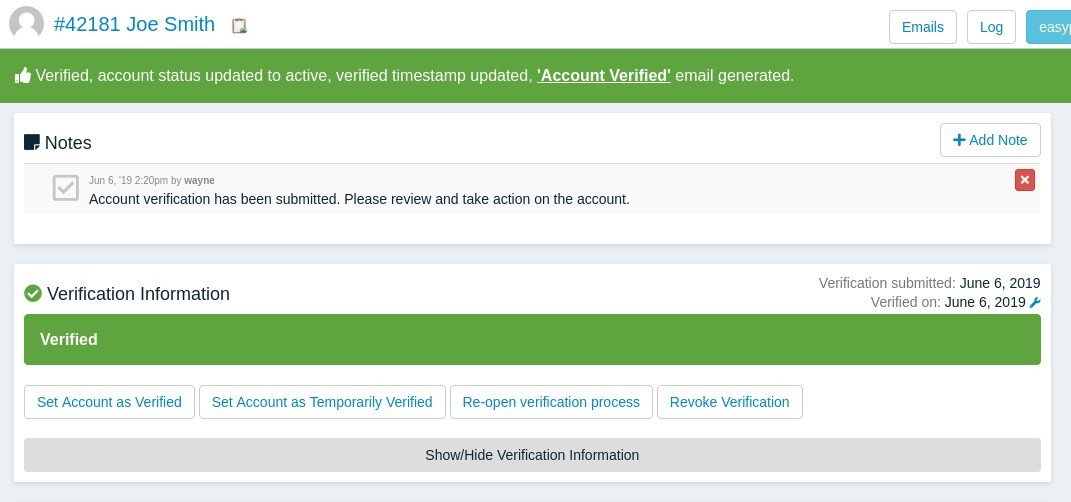
When you log in to the admin dashboard, if there are any pending client verifications you will see a notice. In this screenshot, you can also see that a reminder was placed on the dashboard as well that Joe Smith is ready for verification.
When you click to view the client's account, you'll be able to see their verification information, their household information, and you can set their account to verified as well.
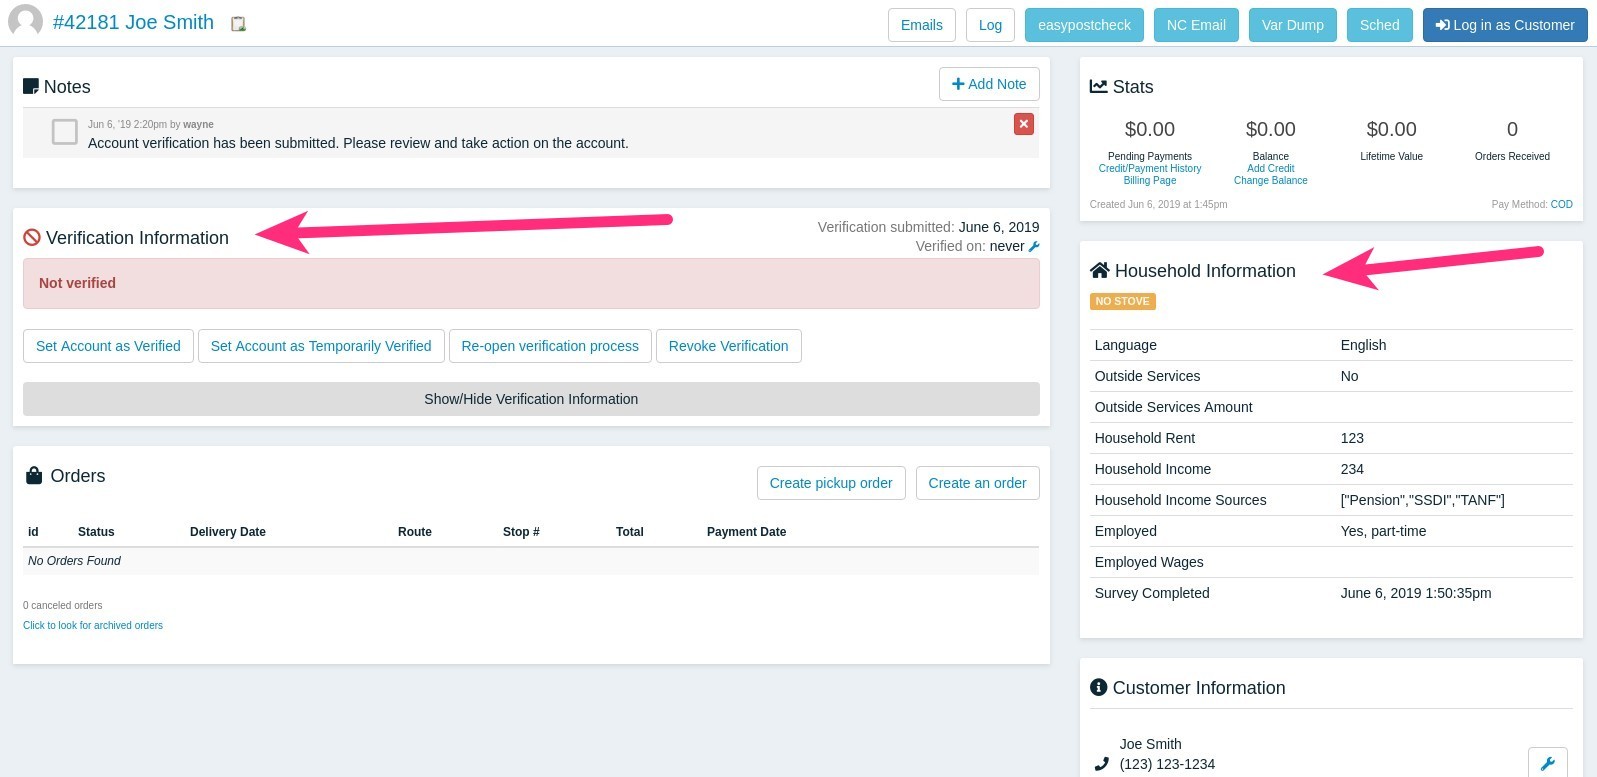
Household Information
The results from the survey the client takes is available in this section for your reference.

Verification Information
In the "Verification Information" section of the client's account overview page on the admin side, you can see the various information on the client's verification uploads, data, and status.
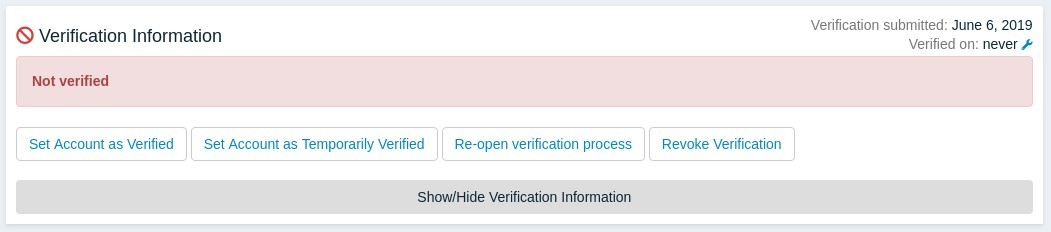
To view the uploads and the answers from the verification process submitted by the client, you can click on the 'Show/Hide Verification Information' button:
Account Verification Buttons
Acter you've verified the client's account, all you have to do is click the 'Set Account as Verified'. Here's what each of the buttons do:
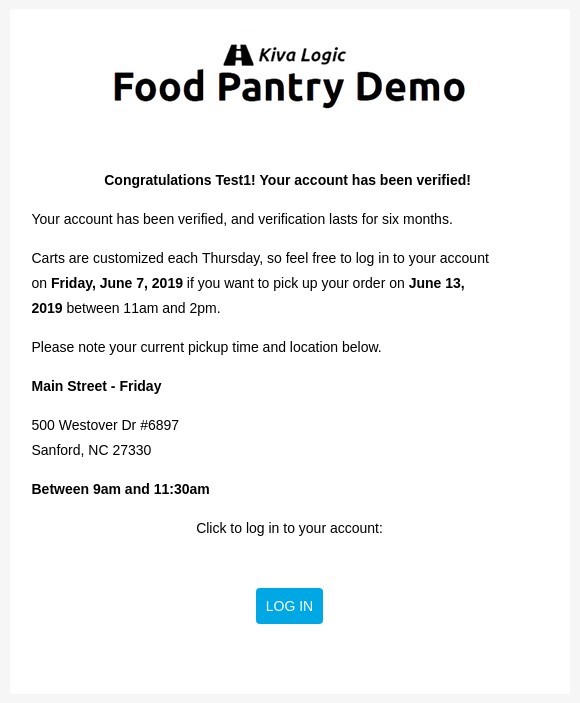
Set Account as Verified This will set the verification date to the current day, update the client status from 'pending' to 'active', and send the 'Client Account Verified' email to the client. This will also automatically review the client's household size to see if any changes should be made to the client's box size.
You can update this email to provide whatever content you think is relevant, or to pass across any other information they might need.
At this point, the client account has been successfully verified and when the next available distribution date happens, the client can log in and open a cart to customize.
Set Account as Temporarily Verified
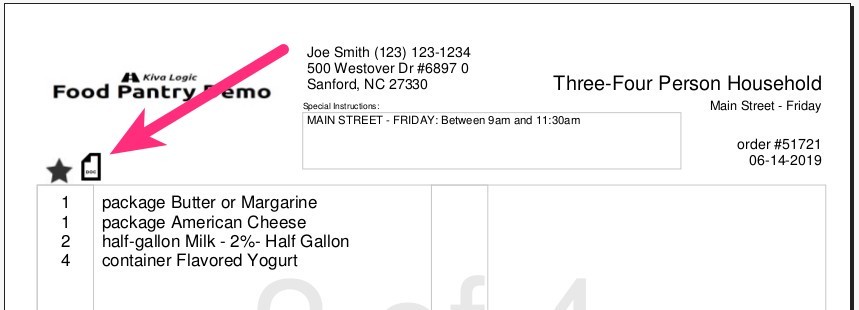
This will set the verification date to today, set the customer status to active, and send the 'Client Account Temporarily Verified' email to the client. A 'temp verify' flag is also set, which will print an icon on the client's order label and automatically set the account back to pending after 30 days. This will also update the box size/type based on household size if necessary to change.
The icon printed on the client's order label is a 'document' icon which should be recognized by your employees/volunteers to mean that the client is missing some verification documents and must provide them before picking up the order.
Re-Open Verification Process
This does not change the customer status at all, it will force the customer back to the verification screen when they log in. If you want their status changed, you will have to do it manually.
Revoke Verification
This sets the client account back to pending, and revokes any previous verification. This will clear the date of last uploaded doc for households, and each member in the household as well.
A Note on How we Store Uploads
We understand that the uploads that clients provide contain sensitive and private data. For each food pantry, a dedicated, isolated, encrypted file bucket is created to store all uploads. The bucket dedicated to your food pantry is accessible ONLY via an API using a secure API access key. The client upload is transmitted over https, encrypted, and stored in the dedicated bucket. When a preview of the upload is required, or when an admin user wants to download the image or file uploaded by the client, a temporary link to the file is provided via the API that decrypts the file/image for viewing and or downloading. These links are not publicly available, they are generated and usable only by the API and admin client overview page and expire after 60 seconds.
We also use a randomly generated string of characters as the file name when storing an upload, so no personally identifiable information is associated with the actual encrypted file.
If a breach of the bucket should somehow occur, the documents and images are encrypted so a 'hacker' would be unable to view or open any of the uploads provided by clients, thus rendering the files useless.
You should be sure that your own organization has documented processes on how to handle any downloads to keep your clients' data secure.
How a Client Orders
Clients are eligible for a 'distribution' once per month. The Kiva Logic software will look at the current date, see if the client's ordering window is currently open, and also see when the last distribution was received by the client to determine when the client can receive their next distribution.
The Kiva Logic software runs on a weekly cycle. When a new week is started, clients eligible to receive a distribution can log in to their account to open a cart. They will have from the time the new week is started until when the cutoff time specified for each pickup location is. Different pickup locations can have different cutoff times.
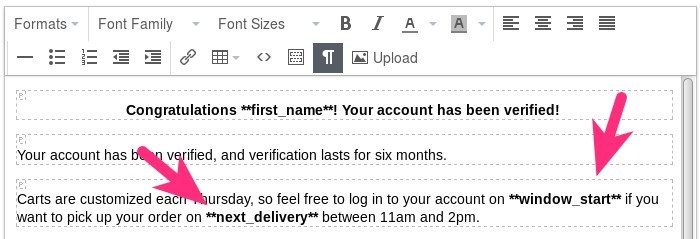
You can set the day and time that a new week is started on the admin side, so that your clients will know when they can log in. All email templates also have access to short-tags that will insert the window opening, the window close, and the distribution pickup date for your client.
Opening a Cart
When a client eligible for a distribution logs in to their account, all they have to do is click a button to start their order.
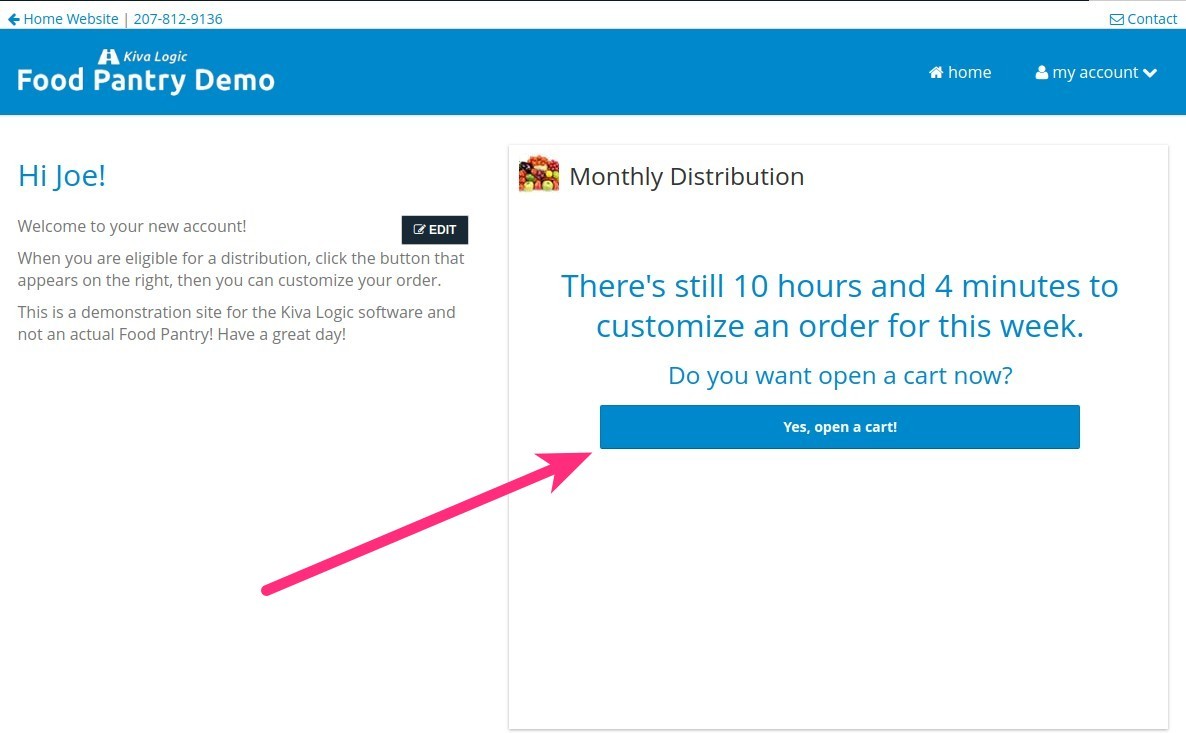
After they click the 'open a cart' button, an order will be generated based off of the menu you have set on the admin side for whatever box size their account has been set up for.
Customizing their Cart
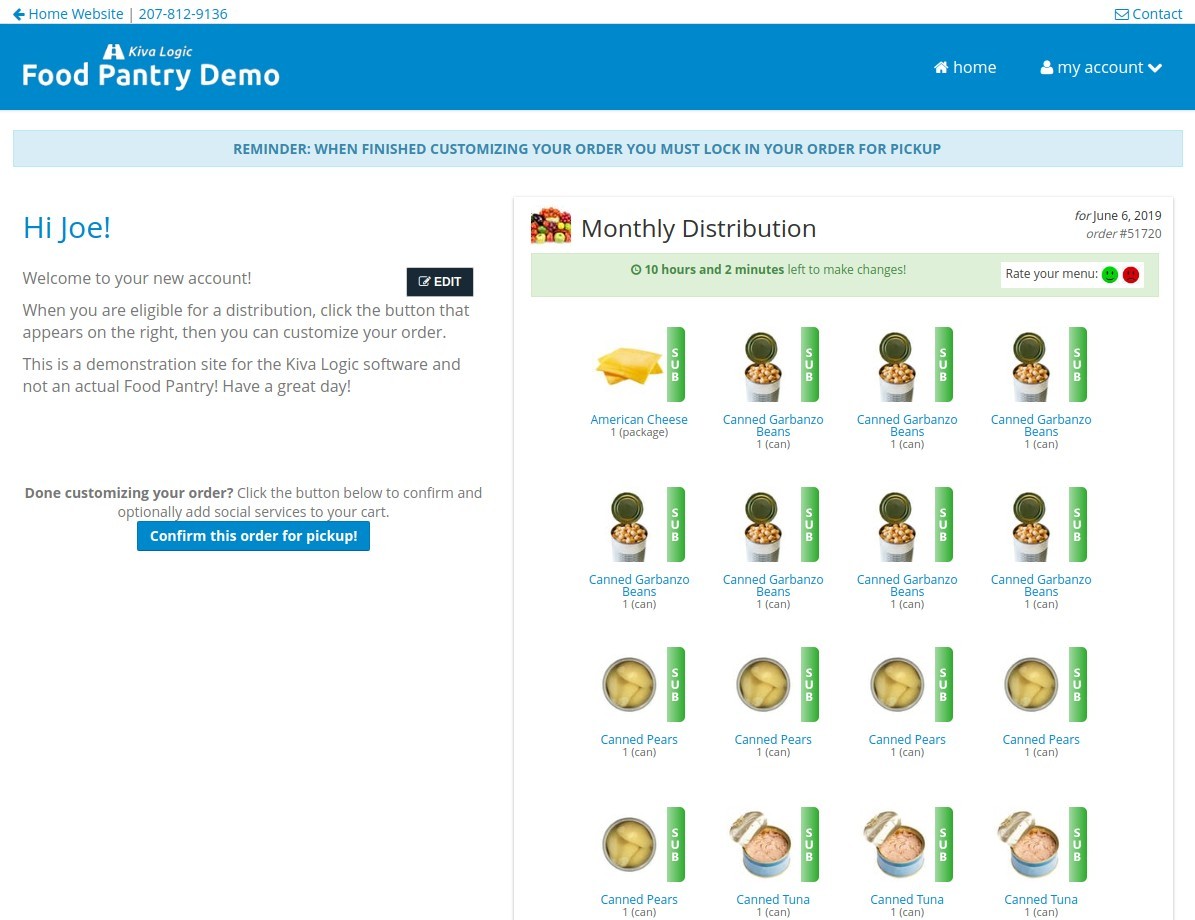
To customize their order, all they have to do is click on an item and select what they would like instead. If they don't want an item, they can select 'no thank you'.
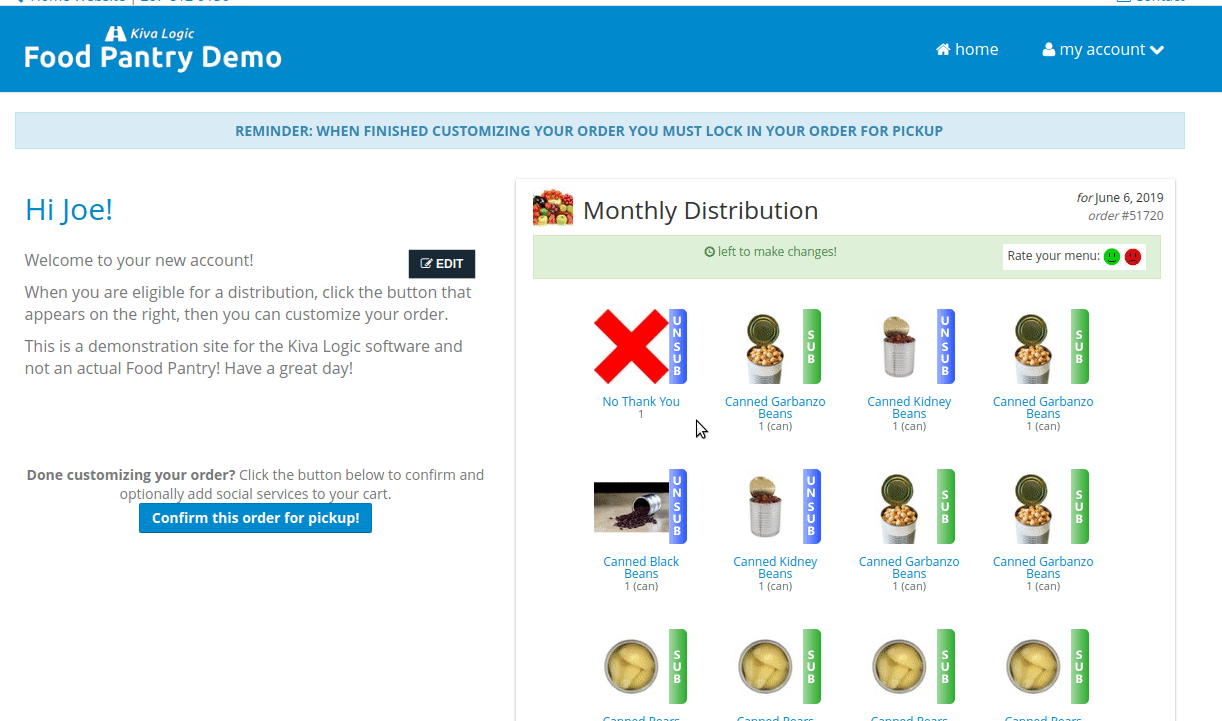
Locking in an Order
After customizing their order, they must lock it in to confirm that they want the order and will pick it up. They can also elect to receive social services during their pickup as well. To lock in an order, clients must click on 'confirm this order for pickup!'.
If a client does NOT lock in their order for pickup, when the window for the week to make order customizations closes, the order will automatically be cancelled.
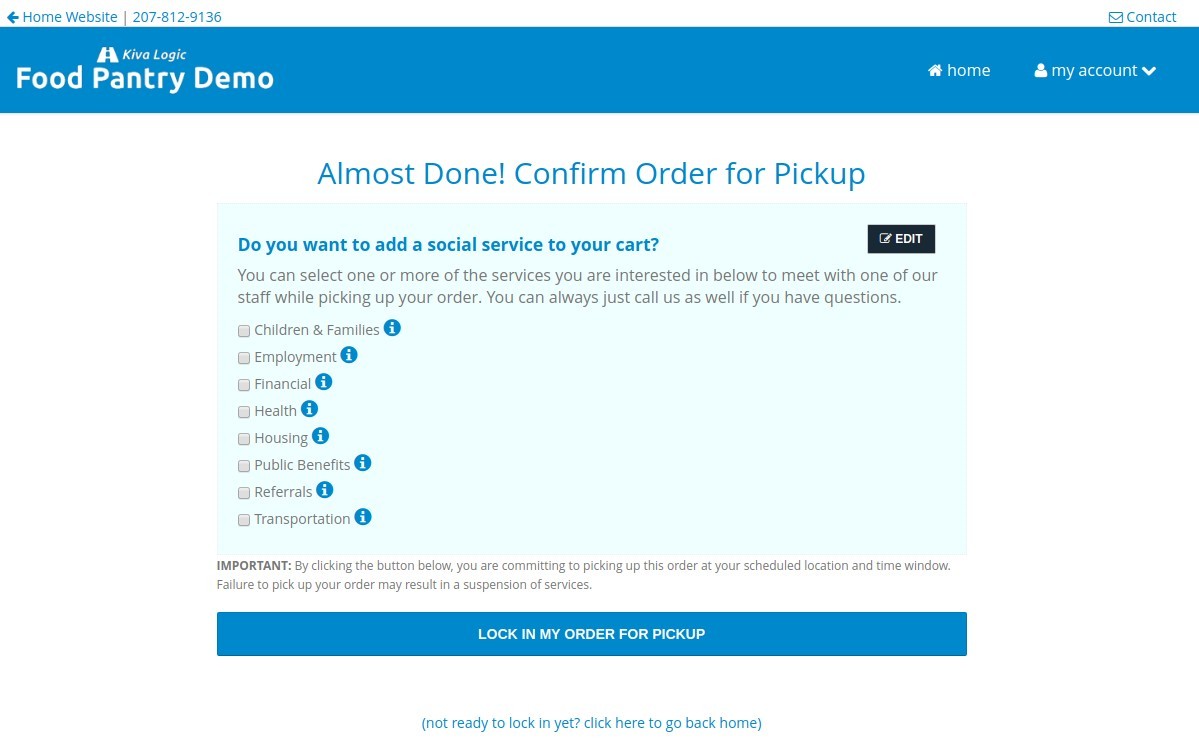
Social Services
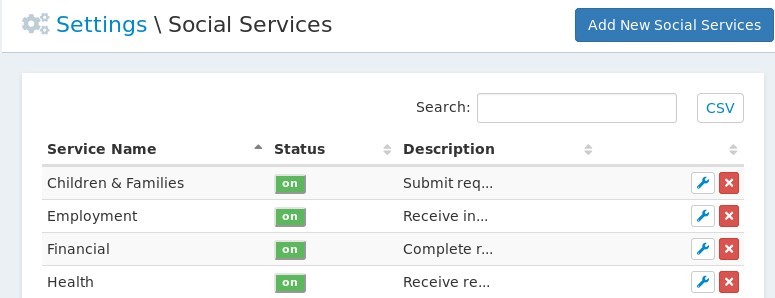
You can edit the social service name and description provided on the order confirmation screen through the admin side on the "Social Services" page.
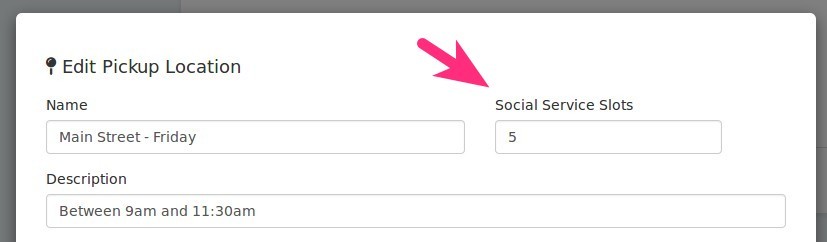
For each pickup location, you can set how many 'slots' are available. Once all the available slots have been filled for that pickup location, no more clients will be allowed to select social services.
The content displayed for when slots are available and when all slots are filled are both editable on the admin side under content->embedded.
If you click on the little "i" icon next to the social service name, a modal popup will appear that contains the description for that service.
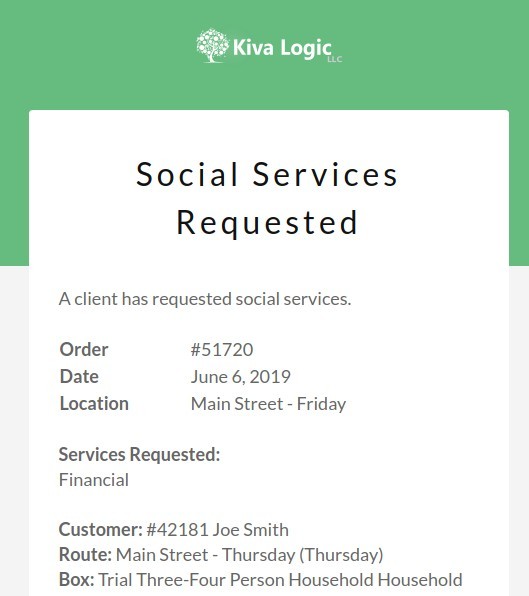
When a client requests social service(s), any admin user with the "Social Services Requested" admin email notification will receive an email notification containing some of the client's details and a list of the services requested.
This admin email notification should be used by your staff to prepare for that client, or can be used to reach out to that client and set a specific time for them to come during the pick-up window, or whatever else you need to do. Here's an example of that admin email notification:
Order Locked & Confirmed!
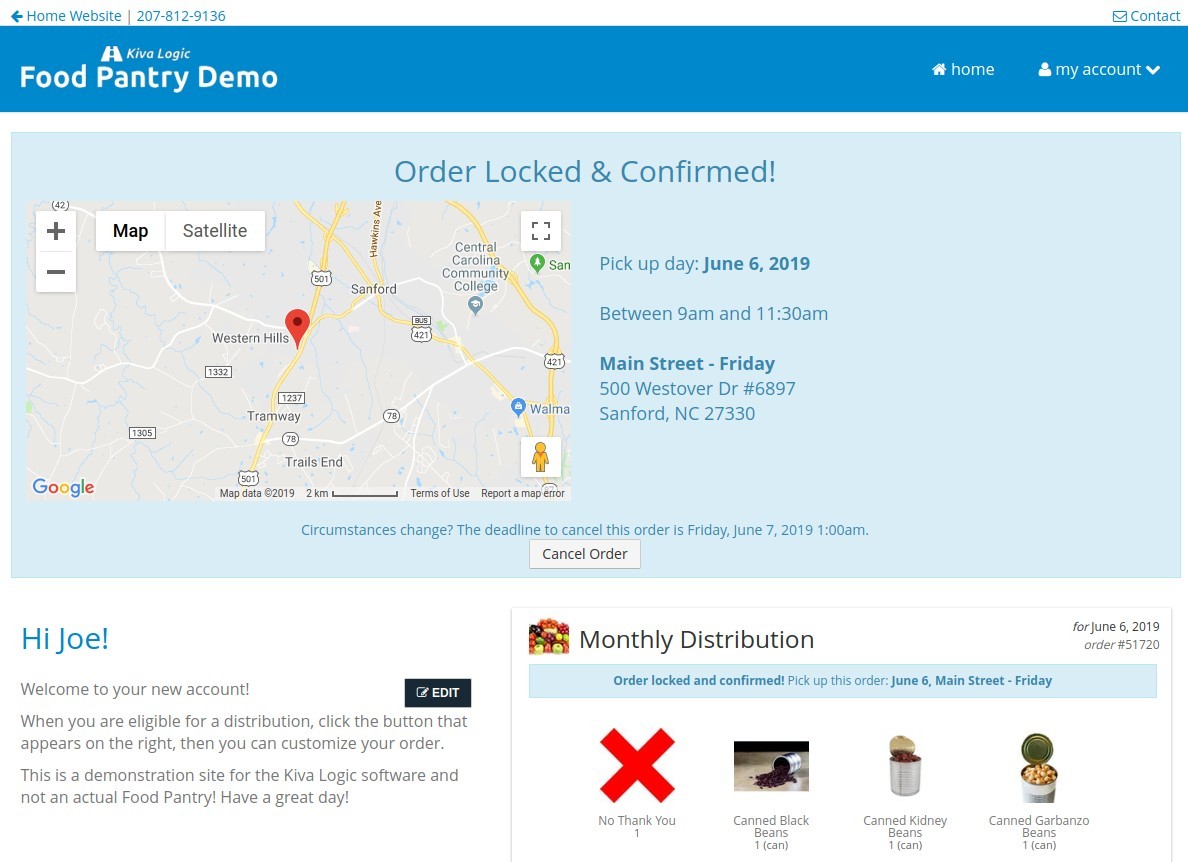
Once the order has been locked and confirmed by the client, they will be taken back to their account home screen. They will now see a banner at the top of the page that contains the details of when to pick up their order, where to pick it up, and a map of their pickup location.
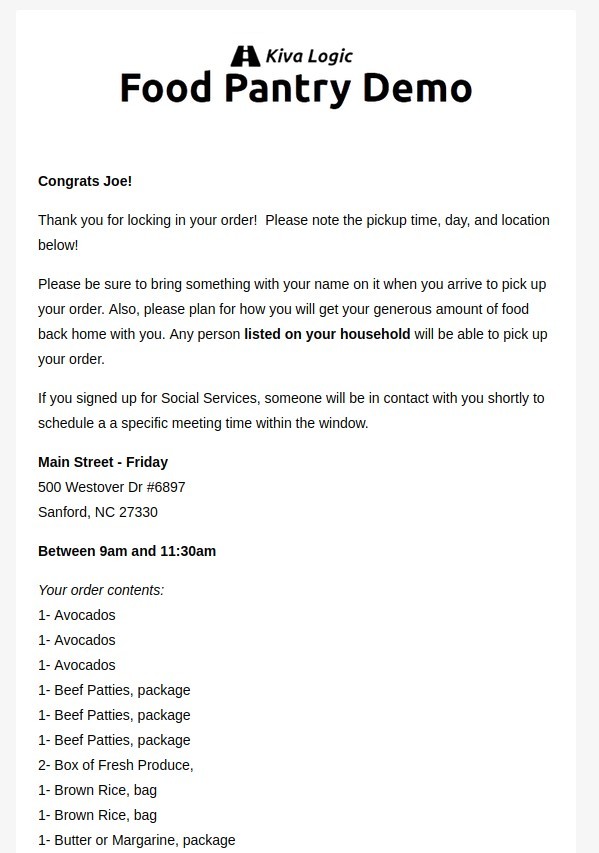
The client will also receive an order confirmation email that you can edit on the admin side from the email templates page. Here is a sample of the email:
Cancelling an Order
If circumstances change, clients can cancel an order anytime before the window closes. If the window closes, the system will display a message saying, "It's too late to cancel, you must pick this order up". To cancel, all they need to do is click the cancel button and then confirm it on the next screen.

If they make a mistake, the software will give them the option to un-cancel their order as well on the cancel complete screen.

Client Re-Verification
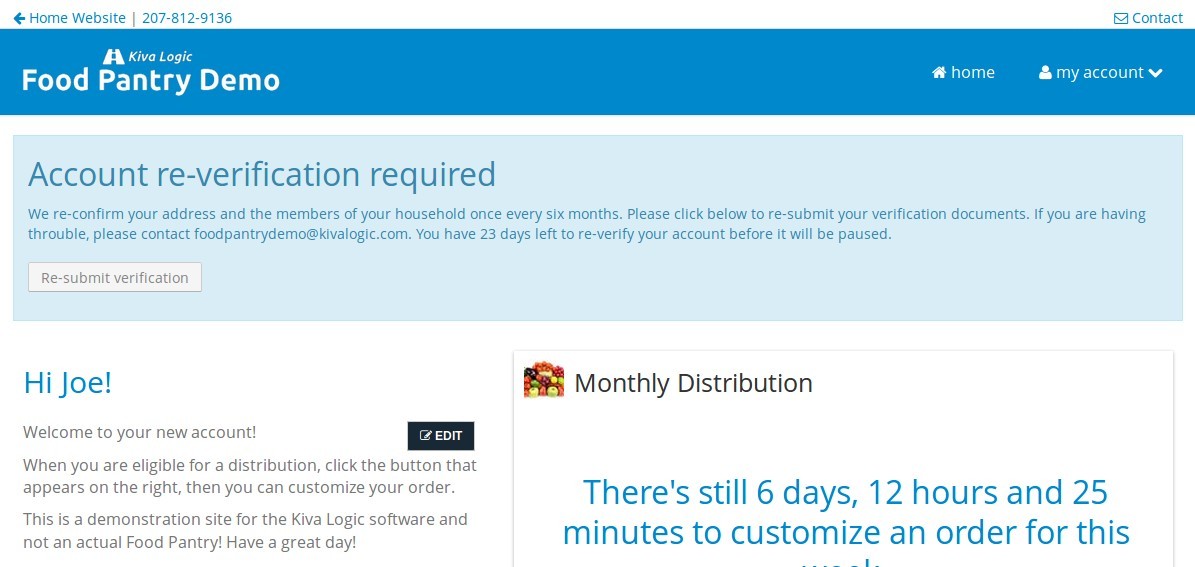
By default, clients are required to re-verify their home address information, and the ID verification for each member of their household every 180 days (6 months).
30 days before their verification expires, they will receive an email titled "Account Verification Expiring Soon" asking them to re-verify, and a banner will be placed on their account home page asking them to re-verify.
Another email notice is set 15 days before expiration, and a final reminder is sent 5 days before expiration.
If a client does not re-verify their account, several things happen automatically:
Their account status is set back to 'pending.'
They will not be able to order until they re-verify.
They will receive an email named titled "Account Verification Expired."
- A note of the event is placed on their account, and the event is also added to the system log.
Boxes for Different Household Sizes
You can have as many boxes and household size variations as your organization demands. For each box, you can set the 'household size minimum' and the 'household size maximum'.
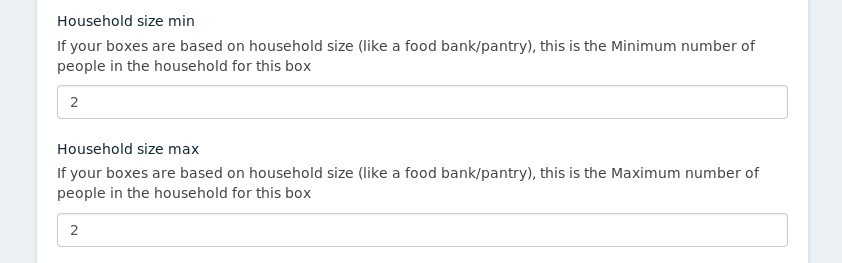
For example, let's say you have a 'Small Box' that is for households that have one to three people, a 'Medium Box' that is for households with four to five people, and a 'Large Box' that is for households that have six to nine people.
If a household is greater than the largest 'household size maximum' that you have set in the software, then the largest box will be assigned to that client.
Box Menus & Inventory Management Notes
Using our Barcode Scanner Inventory App, your employees and volunteers can use their Android phones to scan incoming products to easily keep your inventory up to date. You can also edit and update your inventory any time on the admin side.
For each of your 'Boxes', you will use our 'Box Products' page to set what products are in the box, what quantities of those products are in the box, and what products are available for substitution.
When an order is created, if the software sees that you are 'out' of a certain product that is on the menu, it will automatically do it's best to find a suitable replacement in the same product classification.
Mobile First
Although the screenshots used in this document are from a desktop, we build with a mobile-first mindset. Across the Kiva Logic platform, close to 70% of all page views come from mobile devices, which is why everything we build is designed to be viewed and used on mobile devices. You can visit our demo site on your smartphone or tablet if you'd like to check it out yourself!


Software Origins and Notes
The Kiva Logic software as a service was first launched in July of 2010 for use by subscription-based organic produce home delivery companies. Since then, our software has expanded it's feature set and capabilities and is now used across a variety of industries and business operations. Organic food, pre-made meals, pet supplies, balloons, flowers, ethical meat, kids' cooking kits are just a few of the products and services provided by our customers, and they operate in a variety of different ways; some are subscription based, some à la carte, some have home delivery, some have nationwide delivery, some are pickup only, delivery and pickup, etc.
As such, you'll notice that on the admin side you may still see sections or information that is irrelevant to a non-profit food bank, like 'transaction history' or 'lifetime value' of a client, since you are not dealing with payments.
You may also see that we use the word 'delivery' interchangeably with 'pickup', and 'customer' with 'client' on the admin side as well.
For client-facing features, we always use the proper vernacular and have customized what clients see so there is no confusion. For admin users though, because our software is so vast (not trying to brag), it's just a low priority on our build list to update what words are used. This is because we have so many other things that we would like to build that we think would add more value to both your organization and your clients, and there is no operational or functional impact of leaving the word 'customer' on the admin side.
This is a living document, and we'll keep it updated as new features or questions are developed if need be.
Interested? Get in touch!
If you are interested in using Kiva Logic for your food pantry organization, please send an email to hello@kivalogic.com or send us a message using our contact form.
We look forward to learning about your organization to see if we can help!
Take care,
Wayne